The AI Lost Media Text To Video Colab Workspace!
- AI Lost Media

- Jun 23, 2023
- 3 min read
Hello everyone, wanted to share the colab workspace I am using to generate videos using some of the new higher res SD text to video models. Find link and quick tutorial below. Keep in mind you'll need a colab pro sub to make this work.
Colab:
Text to video tutorial:
Step 1: Click on the play button under "Step 1", wait for it to install. It takes me about 3 minutes.

When the green check mark appears next to the button, go on to step 2.

Step 2: Click on the play button near the model you'd like to install. For getting 3 second clips in colab quickly, I like to use the low res Zero Scope Models (576 or 448). If you want to play with the higher res (Potat1 or ZeroScope XL), trade offs will need to be made with amount of time of clips, resolution and the time it takes to generate clips. For this tutorial I'll be using ZeroScope XL

Once again, wait for that checkmark to show up before moving on to Step 3.
Step 3:
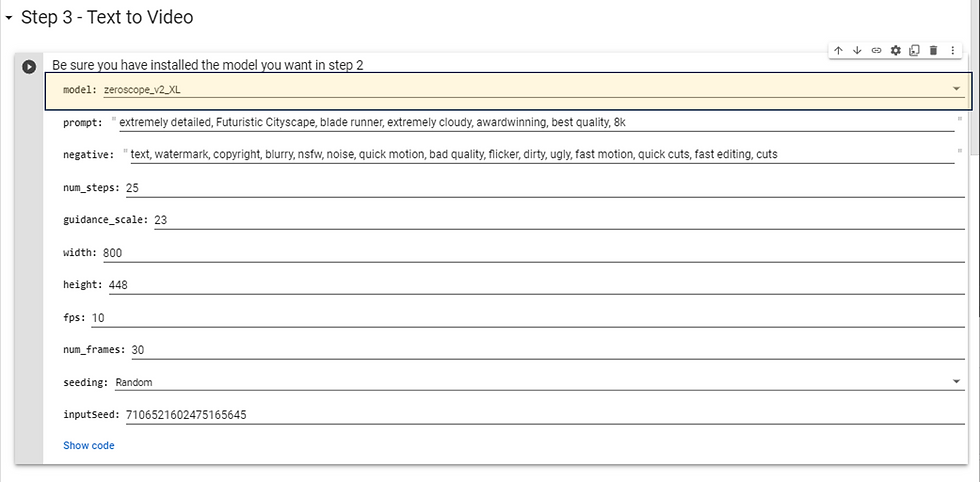
Pick out the model that you would have installed in Step 2 and would like to use! For the higher res models I recommend the settings below, for 3 second good quality clips that don't take too long:

Put in the prompt (and negative prompts if you need them) for the video you would like to generate. Once you've put in your prompt and have the settings the way you would like, once again press the play button.

Once this step has completed your video is ready! click on the folder button on the left side of Colab, then your video will be in the "Outputs" folder (see below)

The video gotten for prompt: "extremely detailed, Futuristic Cityscape, blade runner, extremely cloudy, awardwinning, best quality, 8k".
Keep in mind 10 FPS is pretty choppy so you will want to look at solutions for interpolation. I highly recommend FlowFrames which is free if you have the video card that can run it!
Image to Video Workflow:
Go from this:

To this!
img2vid Step 1:
Click play on "Install 3d Photo inpainting step". Wait for the green checkmark to show up

img2vid Step 2:
Upload the file of the image you would like to animate. After clicking the play button for this one, click on the "Choose Files" button that shows up and it will bring up a browser to select the file from your computer.

For this tutorial I'm using this image that I generated using Midjourney using the prompt: "epic dynamic shot of mad max style car driving toward the camera, post apocalyptic desert, mad max, dust clouds --ar 16:9 --q 1 --v 5"

Once the file is uploaded and you get the green check mark, it's on to Step 3.
img2vid Step 3:
This is where you will select the camera movement you want to take place in your video. Take a moment to read what each parameter does and set them to get your desired outcome

Parameters:
Video Type:
Zoom-In: Similar to a camera zoom in. Makes objects seem closer together as it zooms in.
Dolly-Zoom-In: Replicates a camera actually moving towards an object, will give your subject a bit more depth
Circle: This will cause the camera to move in a circle
Swing: This will cause the camera to swing in orbit around the subject.
Trajectory_Type:
Double straight line will end the video after the x, y, and z parameters have been reached.
Circle will reverse after the x y and z parameters have been reached, ending as the video started.
For x, y, and z, select how much you would like the camera to move in those directions.
Then press play. Keep in mind you may need to do this step a couple time to experiment and get the exact movement you want. Your file can be found in the 3d-photo-inpainting/video folder. Double click on it to download it to see if it looks like a good animation.

Here is my picture with the parameters shown above:
When this step is complete on to Step 4.
img2vid Step 4:
Select a model that you installed in Step 2.

For video path, you're going to want to right click on your file in the 3d-photo-inpainting/video folder, than choose copy path, then paste that into the video_path field.
For video_weight, this is how much the video will look like the original video going in. Since we want more animation in ours, we want to set this pretty low. Between .2 and .3 should work. As you go below .2, it will stop looking at all like the video you put in.
Be sure to also put in the prompt of what you want, adding action words. For my example, I'm going to use my midjourney prompt. along with "action movie" and "smoke"
Click play. Once done, the completed file will appear in outputs.
Final Output:


Great work! Now waiting for upscale and interpolate tutorial.
I am being very grateful for your great work